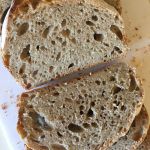
No Knead Spelt Sourdough Bread
Ingredients
- 100 grams active spelt sourdough starter or another kind of sourdough starter
- 100 grams organic whole spelt flour (fine grind if available)
- 300 grams organic all purpose, unbleached spelt flour (also called white spelt flour)
- 1 1/4 tsp sea salt
- 300 ml room temperature water
Instructions
-
In a medium bowl, stir together the flour and salt. Add the sourdough starter and water. Use your hands to gently mix the dough until it is completely incorporated and sticking to your fingers. Cover the bowl with plastic wrap and let sit at room temperature until the surface is dotted with bubbles and the dough is 1 1/2 to 2 times in size (7-8 hours or more depending on how active your sourdough starter is).
-
When the first rise is complete, place your heavy cast iron pot with lid into the oven and pre-heat the oven and the pot to 475 degrees F. Position the rack in the lower third of the oven. The pot needs to pre-heat for at least 30 minutes.
-
Generously dust a work surface with flour. Use a bowl scraper or rubber spatula to scrape the dough out of the bowl in one piece. Using lightly floured hands gently pat the dough out into a rectangle. With your dough spatula (or a large flipper) fold one short side of the dough into the middle and then fold the other short side on top. Then fold the dough in half the other direction. Dust lightly with flour, cover with plastic and let rest for 5 minutes. While you are waiting, line a medium sized bowl with parchment paper, using your fist to push the paper down into the bowl and your other hand to crease the paper around the inside and top edge of the bowl.
-
Repeat the folding process outlined above a second time, let the dough rest for 5 minutes and then repeat folding process a third time. With lightly floured hands, lift the dough and place it into the parchment lined bowl seam side down. Cover with plastic and place on the counter next to the stove for 20 minutes for the second rise. To test if the dough is ready, press, do not poke, the tip of one floured finger quickly and lightly, about half an inch, slightly off center, into the crown of the dough (area of maximum expansion). If the indentation remains but springs back slightly, the dough is ready for the oven. If the dent fills in, give the dough another 5-10 minutes to rise and re-test.
-
Remove the plastic covering from your bread dough. Using heat resistant pot holders, carefully remove the pot from the oven and remove the lid. Using both hands, lift the dough out of the bowl by holding all corners of the parchment paper and lower it into the pot. The edges of the parchment paper will brown, but will be just fine in the hot oven.
-
Working quickly dust the top of the bread with flour using a small sieve (optional). Use a sharp pair of scissors to make 3-4 shallow cuts at a 45 degree angle along the center line of the dough to assist in "oven spring". Cover the pot with the lid and put it back into the oven. Reduce the heat to 450 degrees F and bake for 30 minutes.
-
After 30 minutes, remove the lid and place a large baking sheet or tin foil on the rack underneath the pot (to help prevent burning on the bottom) and continue baking for another 10 minutes until the bread is a lovely chestnut color but not burnt. Use a heatproof spatula or pot holders to carefully lift the bread out of the hot pot and place it on a rack to cool thoroughly. If you have an instant read thermometer, the bread is done when the internal temperature is 190-200 degrees F.
Recipe Notes
This bread can also be baked in a loaf tin (as in my pictures) instead of a cast iron pot. The process is the same, but the bread dough sits in the the loaf tin for the second rise instead of a parchment paper lined bowl.
I find the best way to store this bread is to cut it all into slices after it has cooled and freeze all the slices in a plastic zip bag. This way you can take out as many slices as you want from the freezer, thaw them and/or toast them and enjoy homemade bread that's just as good as the day you made it!