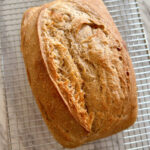
Wheat, Spelt and Rye Sourdough Pan Loaf
Ingredients
- 304 grams organic, all purpose wheat flour
- 87 grams organic, whole spelt flour
- 43 grams organic, whole rye flour
- 9 grams sea salt
- 108 grams sourdough starter at 100% hydration
- 325 grams water
Instructions
Feed your Sourdough Starter
-
Feed your sourdough starter 6-8 hours before making the dough (I typically feed mine in the evening before I go to bed and make the dough first thing in the morning).
-
In a large bowl, whisk together the wheat, spelt and rye flour with the salt. Cover with a tea towel and set aside. I like to prep this ahead of time but this can be done right before you make the dough.
Make the Dough
-
When your starter has at least doubled and is filled with air bubbles you are ready to make the dough.
-
The desired dough temperature (or DDT) is 78F. To determine what the temperature of the water should be to achieve the DDT, calculate 78F x 4 (4 temperature factors: starter, air, flour, and water). Deduct a friction factor of 20 (some bakers use a lower friction factor of 5 or 10 but my dough always ended up being too warm after I mixed it so I increased my friction factor to 20 to achieve the correct dough temperature). Use a digital or infrared thermometer to take the temperature of the starter, the air, and the flour/salt mixture. Deduct all three of these numbers to arrive at your required water temperature.
The formula looks like this:
(78 x 4) - 20 (Friction Factor) - starter temp - air temp - flour temp = water temp
-
Fill one large jug or glass measuring cup with hot water and another with cold water. With the digital thermometer in the jug of hot water, pour the cold water into the hot water until the water temperature you need is achieved. Then, with the bowl of flours/salt on a kitchen scale, measure and pour the water over the flour. Zero the scale and add the starter. Swirl and disburse the starter into the water with your fingers. Squish, fold and mix the dough together with your hands until there are no dry spots or lumps. Take the temperature of the dough with your thermometer. If it is higher than 78F, cover the bowl with a tea towel and place it somewhere cool until it reaches 78F. If it is lower than 78F, cover the bowl with a tea towel and place it somewhere warm until it reaches 78F.
Stretch and Fold
-
Let the dough rest for 1 hour. After the rest, stretch and fold the dough by grabbing a piece of it with wet fingers from the outside edge then gently lift and fold that piece of dough over to the other side. Continue around the dough in a clock-wise fashion until the dough has tightened. This usually takes me 4 or 5 grabs. Repeat the 1 hour covered rest followed by stretch and folds twice more for a total of three stretch and fold periods. After the third and final stretch and fold allow the dough to rest for 30 minutes.
Pre-Shape and Rest
-
Lightly flour your work surface and scrape the dough on to it. Using lightly floured hands, gently flatten the dough into a rectangle then lift the bottom edge up 3/4 of the way to the top. Bring both sides one over the other like swaddling a baby. Roll the dough up from the bottom to the top and then over so the seam is facing down. Round the dough by sliding a dough scraper or your hands underneath the far side of it and gently pull it towards you. Give it a quarter turn and repeat this process until you have a nice tightened round (without tearing the dough). If the dough is not catching as you pull, scrape away some of the flour on your work surface and try again. Dust the top of the dough with flour and cover with a kitchen towel. Let rest for 30 minutes.
Final Shape
-
Lightly grease a loaf pan with oil or non-stick baking spray and set aside.
-
Lightly flour your work surface again and using a dough scraper, flip the dough upside down so the seam is now facing up. Lightly flour your hands and flatten the dough into a rectangle again. Lift the bottom edge up 3/4 of the way to the top and bring both sides one over the other like swaddling a baby. Bring the bottom edge up to the top and use your hands to continue rolling the dough into a tight cylinder with the seam on the bottom. Seal both ends of the cylinder with the side of each hand and tuck any loose dough underneath. Use the bench scraper to lift the dough and place it into the prepared loaf pan seam side down.
Final Rise
-
Cover the pan with a tea towel and allow the dough to rise for 1.5 to 2 hours at room temperature (I am assuming a room temperature of 68F/21C here. If your room temperature is cooler the final rise will take longer, if your room temperature is warmer, the final rise will take less time).
To test if the dough is fully proofed, press, do not poke, the tip of one wet finger quickly and lightly, about half an inch, slightly off center, into the crown of the dough (area of maximum expansion). If the indentation remains but springs back quite slowly, the dough is ready to bake or chill. If the dent springs back quickly and/or fills in, give the dough another 15 minutes to proof and re-test.
-
Baking the dough right away: pre-heat your oven to 500 degrees F (or as high as your oven will go) during the final rise.
-
Chilling the dough: this is my preference as it enhances the flavour and makes it much easier to score. Cover the loaf pan and place the dough in the fridge for up to 16 hours. I typically cover it with a flat zip loc bag or other food safe plastic that is not plastic wrap as my fridge tends to dry out the dough if I cover it with a tea towel.
When are you ready to bake, pre-heat your oven to 500 degrees F (or as high as your oven will go) for a minimum of one hour.
Score and Bake
-
Place the loaf pan on the counter and score any small marks you want to make first (optional), then score a deeper one from one end of the dough to the other at a 30 degree angle. Re-cut the large score again at a 30 degree angle to deepen it. Liberally spray the top of the dough with water. Place it in the oven on the middle rack, reduce the temperature to 475F and bake for 20 minutes. Reduce the temperature to 450F and bake for another 10-15 minutes until the loaf is a deep golden brown or as dark as you would like it.
Cool and Enjoy!
-
Remove the bread from the loaf pan and allow to cool completely on a wire rack before slicing.